
Tips
Is Local Disk C full and making your laptop sluggish? Come on, follow these steps to overcome a full Local Disk C on Windows and restore your laptop’s speed!
Follow us on Google

A slow laptop or computer definitely disrupts daily productivity, especially when used for work or study. If this happens, you should first identify the main cause. Usually, this problem occurs because the laptop is old, the operating system hasn’t been updated, or because the Local Disk C indicator is full.
When using a Windows laptop, you should regularly check the indicator line in File Explorer. If the system drive capacity is almost full, the color of the indicator line will turn red.

The impact is significant: laptop performance drops sharply, applications feel heavy to open, frequent lag occurs, and the device suddenly freezes. This is normal because Local Disk C is the primary location where the Windows operating system operates.
So, how do you overcome a full Local Disk C to make the laptop run smoothly again? Come on, follow some practical tips below!
Effective Ways to Overcome a Full Local Disk C
Here are step-by-step instructions on how to empty Drive C storage and the most effective ways to clean Windows junk files:
1. Utilize the Built-in Disk Cleanup Feature
This built-in Windows tool is highly effective for scanning temporary files, cache, and thumbnails that are no longer needed by the system.
Steps:
- Press the Windows + S key combination, type Disk Cleanup, and press Enter.
- Select drive (C:) and then click OK.
- Check the files you want to clean, such as Temporary Files, Thumbnails, and Recycle Bin.
- Click the Clean up system files button to delete old Windows Update residual files that can reach several GB in size.
- Wait for the scanning process to finish, then click OK and Delete Files.
2. Manually Clean the Temporary Folder
In addition to using Disk Cleanup, you need to manually clean the Temporary folder. This folder is always filled because every running application automatically creates temporary files.
Steps:
- Press Windows + R on the keyboard to open the Run window.
- Type %temp% and press Enter.
- Once the folder opens, press Ctrl + A to select all files.
- Press Shift + Delete to permanently delete all those junk files.
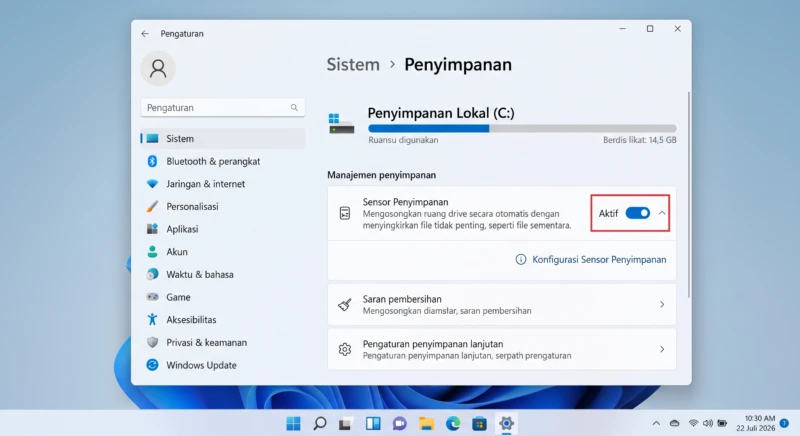
3. Enable the Storage Sense Feature
If you don’t want to bother with manual cleaning, enable the Storage Sense feature in Windows 10 or Windows 11. This feature automatically deletes junk files according to a schedule.
Steps:
- Open the Settings menu by pressing Windows + I.
- Go to System > select Storage.
- Toggle the Storage Sense feature switch to On.
- Click Storage Sense to adjust the automatic cleaning frequency (e.g., every week or every month).
4. Uninstall Rarely Used Applications and Games
Video editing software, graphic design programs, and large games installed on Drive C become the cause of a quickly full Disk C. Deleting unused applications is a fast option to overcome a slow laptop.
Steps:
- Open Settings (Windows + I) > select Apps > Installed apps.
- Sort the application list by Size so that the heaviest applications appear at the top.
- Select an application that is no longer used, click the three-dot icon next to it, and select Uninstall.
5. Empty the Recycle Bin and Downloads Folder
Many people are unaware that deleted files are still stored in the Recycle Bin. Additionally, the Downloads folder often becomes a nest for accumulating installers and large media files.
Steps:
- Right-click the Recycle Bin icon on the desktop and select Empty Recycle Bin.
- Open File Explorer, go to the Downloads folder, move important files to another drive, and delete the remaining unused files.
6. Move Personal Files and Change Default Storage Location
Ideally, Local Disk C should only be used specifically for the operating system and main applications. Move personal documents, photos, and videos to Local Disk D, a secondary SSD, or an external hard disk.
Steps:
- Use the Cut command (Ctrl + X) on personal files in Drive C, then Paste (Ctrl + V) in Drive D.
- Change the default storage location by going to Settings > System > Storage > Advanced storage settings > Where new content is saved, then change the storage location to Drive D.
What is the Ideal Remaining Space for Local Disk C?
As a general rule, try to leave at least 15% – 20% of the total capacity of Local Disk C as free space.
This extra space is essential for the Windows operating system to allocate Virtual Memory (Paging File) to keep laptop performance smooth when you open many applications at once (multitasking).
Frequently Asked Questions
Why does Local Disk C keep getting full on its own even if I’m not storing new files?
This is caused by a buildup of application cache files, automatic installation files from Windows Update updates, and Virtual Memory files (hiberfil.sys and pagefile.sys) that continue to grow with use.
Is it safe to delete everything in the %temp% folder?
It’s very safe. The contents of the %temp% folder only contain temporary data from closed applications. If a file is being used by the system, Windows will automatically reject its deletion.
Can deleting files on Drive C speed up laptop performance?
Yes, it’s very impactful. Creating free space on Drive C gives Windows room to process temporary files and Virtual Memory, so the laptop no longer feels sluggish or freezes.
Well, these are the most effective and safe ways to overcome a full Local Disk C that you can do yourself at home. By regularly cleaning junk files and managing storage space, your laptop’s performance is guaranteed to be fast and responsive again!
Want to know tricks about Windows repairs, laptop maintenance tips, or other interesting technology tutorials? Don’t forget to keep reading trusted articles only at TheCuy Tekno!
Thank you for visiting thecuy. 🙂

Penulis Berpengalaman 5 tahun.