
Sudah lelah mengetik tanda titik dan nomor halaman secara manual? Yuk, simak panduan membuat daftar isi otomatis di Word berikut ini!
Knowing how to create an automatic table of contents in Word is an essential technical (basic) skill that everyone must master, whether students or office workers.
A table of contents serves as a crucial navigation map in compiling large‑scale formal documents, such as final assignments, theses, field work practice reports (PKL), to the creation of company profile books.
Have you ever created a table of contents manually by pressing the dot key repeatedly on the keyboard, then guessing the page numbers to make them look straight? If so, stop doing that old habit!

Besides taking hours, the manual method is highly prone to chaos if later sentences are added, causing page numbers to shift.
Microsoft Word actually provides a built‑in intelligent feature that can automatically read chapter arrangements and compile them into a precise table of contents.
So, what are the step‑by‑step instructions from start to finish? Come on, check out the comprehensive guide below!
Cara Membuat Daftar Isi Otomatis di Word
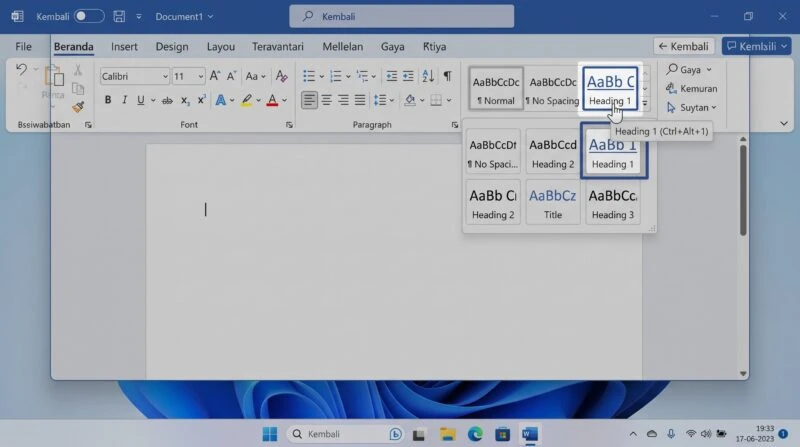
1. Apply Heading Styles
This is the most important secret that beginners often miss. Before you can execute how to create an automatic table of contents in Word, you must tell the Word system which text is a Chapter Title and which is a Sub‑Chapter. The way to do this is by using the Heading feature.
Here are the steps to set up Heading in your document:
- Open your thesis or scientific paper document in Microsoft Word.
- Highlight the text that serves as the main title or chapter heading. Example: ‘BAB I INTRODUCTION’.
- Go to the Home tab at the top.
- In the Styles group, click Heading 1. (This text will be read by the system as the highest level in the table of contents.)
- Next, select the text that serves as a subheading (child chapter). Example: ‘1.1 Background’ or ‘1.2 Problem Formulation’.
- In the Styles group, click Heading 2.
- If there are further subheadings within ‘Background’, you can highlight and select Heading 3.
- Apply this Heading formatting consistently throughout all pages of the document, starting from the Preface, References, to the Appendix.
Pro Tip: When you click on Heading, the text color usually turns to the default blue in Word. Don’t panic! Just right‑click on the ‘Heading 1’ box, select Modify, then change the font color back to black, make it bold, and align it to the center.
2. Insert Automatic Table of Contents
After all titles and sub‑chapters have been given the Heading attribute, you’re now ready to reap the results. Creating a table of contents now takes less than 5 seconds!
- Prepare a dedicated blank page. This page is usually placed right after the ‘Preface’ page and before ‘CHAPTER I’.
- Place the blinking cursor at the topmost line of the blank page.
- Switch to the References tab in the top menu bar.
- Look at the far left corner of the screen, then click the Table of Contents icon.
- A dropdown menu with several style options will appear. Choose Automatic Table 1 or Automatic Table 2.
- Done! In the blink of an eye, the table of contents will be automatically created, complete with indented sub‑chapters, perfectly aligned dot leaders, and highly accurate page numbers.
You can change the blue text ‘Contents’ or ‘Table of Contents’ at the top to black ‘DAFTAR ISI’ and center it (Center) to match the format of scientific writing in Indonesia.
3. Update Table of Contents When Revisions Occur
The main advantage of creating an automatic table of contents in Word is its flexibility. When you receive revisions from a supervisor requiring you to add 5 new pages in the middle of Chapter II, you don’t need to create a table of contents from scratch again.
The Word system can instantly adjust for the page shift. Here’s how:
- Scroll back to the page where your table of contents is located.
- Click once anywhere in the table of contents text area until a thin gray box frames the entire table of contents.
- In the top left corner of that frame, click the Update Table button.
- A small dialog box (pop‑up) will appear with two action options:
- Update page numbers only: Choose this option if you have only added/removed paragraphs causing page numbers to shift, but you have not changed, added, or removed chapter titles at all.
- Update entire table: Choose this option if there are new sub‑chapter titles added, sentences changed in titles, or certain chapters deleted in the manuscript.
- Click OK. All page numbers and title rows in the table of contents will automatically adjust to the latest state of your document.
FAQ
Why doesn’t my chapter title appear in the Table of Contents?
This is 100% because you forgot (or missed) to apply Heading 1, Heading 2, or Heading 3 styles to the title text. Re‑select the missing title, apply Heading, then perform an Update entire table.
Can this method be used on Microsoft Word for MacBook (macOS)?
Absolutely. The layout of the Styles menu (in the Home tab) and the Table of Contents (in the References tab) in both Windows and Mac (macOS) versions of Microsoft Word are identical and function in the same way.
How can I get the References and Appendix to appear in the table of contents without having a chapter number?
It’s easy. Just highlight the text ‘DAFTAR PUSTAKA’ and apply Heading 1. The system will include it in the main table of contents (left‑aligned) alongside Chapter I, Chapter II, and so on.
It’s very easy, effective, and satisfying, isn’t it? By mastering how to create an automatic table of contents in Word using a combination of Heading and the References feature, you’ll never again feel frustrated by messy page numbers or uneven dot lines when compiling academic documents.
Want to keep updating your skills with secret Microsoft Office tricks, tutorials to maximize computer software productivity, and various other trusted tech guides? Come on, don’t forget to always keep up with the latest articles only on TheCuy Tekno!
Thank you for visiting thecuy. 🙂

Penulis Berpengalaman 5 tahun.